

Here I am, pretty excited about the idea of doing both my first tutorial and my first giveaway. However, as I’ve been preparing this I’m realizing that there’s really no way to do this short and sweet. Tutorials take up some time and space, eh? So, if you need to run and do some laundry or grocery shopping or head to work for the day, leave this tab open and come back later when you have a moment to read. But don’t forget to come back because, well, GIVEAWAY!! And a great t-shirt hack. Being it’s my first tutorial I won’t lay claim to it being “great” just yet. I probably need practice, but I hope it’s a good first try.
Last year I missed our town’s first Colour Run. This year I somehow managed to get the whole family out for it and I am so glad we did it. My girls were real troopers and ran most of the 5k which is more than I expected! They went almost a full mile before our first short walk break!! I was so impressed with them.

I knew we were going to all run together in the event for awhile, but I waited till the last minute to actually go and register so we fell victim to whatever was left of the shirts.

Now, what does a Mami with a sewing machine do? I had no choice but to do some shirt refashioning. I meant to just do something quick and simple, but ended up with a pattern hack that I will DEFINITELY be doing again. I love how these turned out so I thought I’d share what I did. But first….

It all started with the Isla pattern by Simple Life. Yup! That’s the pattern I get to give away!! I’ve had this pattern for a bit and finally got around to making one a few weeks ago. This meant I knew how it fit and how easy the pattern was. AND when I made this one I totally forgot to add the the sleeves that I had cut out right beside me and ended up making a tank top instead. That was a weird moment that left me some perfectly good sleeves all cut out and ready to go.
The heart cut out is what drew me to this pattern and being a knit top makes it one that my daughter loves to wear. It’s comfy and easy. I use a lot of Simple Life patterns and have yet to find one that I don’t like.

So with the sleeves already sitting there, this pattern became the obvious choice to use as a base for the Colour Run shirt refashion. And I like that I was able to use up some knit scraps because I have a hard time throwing away pieces of fabric!
Before cutting I needed to figure the sizing the girls would need and I determined to size up to get a looser fit. The original Isla that you just saw is in a size 10 which is the correct size for my oldest. You can see it’s a close fit (though not tight). But I wanted a loose t-shirt style so the size 10 I now used for my youngest who normally would get a size 7 or 8. The one size up worked great for both of them.
On to the cutting. I started with the front bodice and I don’t have enough pictures to explain what I did so I hope I can word this well enough.
The logo was too wide to fit on the top narrower portion of the new bodice. I moved the pattern piece up on the old shirt so that the logo was now chest level on the new one. This gave enough room for all the words to fit across…. Except now the neckline of the original shirt was too low cutting across the new bodice. It wasn’t going to work and in order to make it fit, I needed to make some adjustments. Easily solved by piecing and creating a “new” piece of fabric to cut from! I cut the shirt about 1 1/2″ above the logo and grabbed my stack of scraps. I was pleased to find a piece that was JUST wide enough to fit that top narrow bodice portion. I centered it and serged it on and then went back for my pattern piece for the actual cutting.


I pinned the front bodice pattern piece (on the fold, of course) to my newly created “fabric” and you can see the pattern peeking out from below the green shirt a bit. I then used this green shirt for a reference on length since the Isla bodice is short and meant to have a skirt attached. I matched up the armpit points and then marked on the fabric how far down I wanted the top to go and cut down from the armpit to my marking at a slight angle outwards. I wanted to be sure there was enough room around the hips. I would say I angled out only about 3/4″ at the very bottom. It wasn’t too much. Don’t forget to add length for the hem. I did about 3/4″. After this, the front piece was now ready.
For the back of the shirt I decided I wanted to do something fun which meant I needed to create an actual pattern piece instead of the “eyeball it” method I used when cutting the bottom of the front piece. I have a large roll of tracing paper that I use for my patterns which is very handy for things like this. I got it from www.well.ca though I’m sure those who are able to order from Amazon would find it easily there as well. I like using the tracing paper because it’s nice and thin and doesn’t bulk up my file box where I store my patterns the same way that regular paper does. With all my PDF patterns I just print once and use the tracing paper for the different sizes and it saves on the amount of paper running through my printer.

My pattern was not going to be mirrored which meant needing a full pattern piece for the back as opposed to the typical “cut on the fold”. So I folded the paper in half and traced the top half of the back pattern piece in the size I wanted from the neckline down to the armpit. I then extended the side all the way down to match the side seam on the front bodice piece and I did that using the actual front piece I had already cut. Again, I angled slightly outward towards the bottom to create some room around the hip area. Sorry, I didn’t grab a picture of how I lined that up.

Then I opened the tracing paper up and using some fancy tailoring ruler that I happen to have I drew and cut an angled line from bottom of one side and ending about 4″ below the opposite armpit.
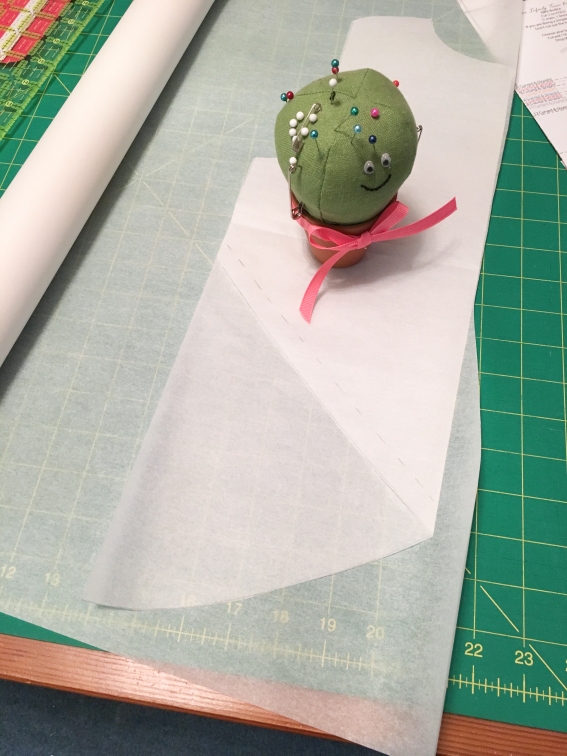 Next, I needed to create the pattern piece for the opposite bottom corner to create that tulip hem. I folded the full piece in half again and lay it on top of my tracing paper. I traced out the triangle you see at the bottom but added a seam allowance to the side of the triangle piece indicated by the dotted line. (Just in case my picture is confusing, the seam allowance is added to the triangle piece only. It’s assumed the front and the larger back piece already have the seam allowance added.) Since I decided I wanted my hemline seam allowance to be about 3/4″. I just added another scant 1/2″ to that for a total of 1¼” and that’s what I added to the side of my triangle. You will be folding and ironing the top fabric under to hem and then you’ll have that extra bit on the triangle for the other piece to overlap onto and be sewn together in the following steps. (Man! This business of explaining things is not easy! I hope you are able to follow and understand.)


At this point I had the two pieces I needed for the back.

I lay my finished pattern piece over the old shirt and I had just enough left in the bottom corner for my triangular piece. It was pretty much just right.
Now comes the construction. I followed the Isla instructions for attaching the front and back pieces together as well as the sleeves. Then I serged down the one side of the shirt that had the lengths that matched.

For the other side I sewed up only a couple inches from the hem approximately to where I’m pointing. The rest of the side all the way up thru the sleeve is left open for now and I’m ready to hem. I ironed my hemline all the way around. And now this part gets even trickier to explain.
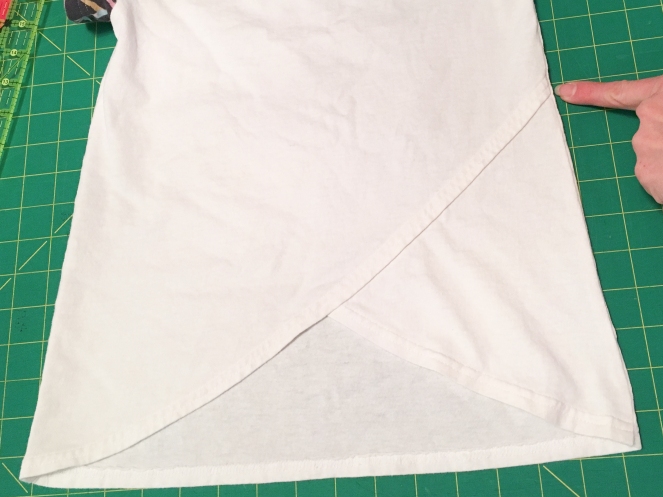
With the shirt still inside out (not like the picture) I pinned the remaining side closed from the sleeve down to the point where I had already sewn those last couple inches at the hem. Then I pinned along the angled edge attaching the triangle piece from that spot I’m pointing to and going down to the centre back point. I made sure that the larger piece of fabric was overlapped on top of the small triangle piece about 1/2″. You want to do this pinning now to ensure everything is laying straight and that the two pieces are overlapping nicely. Once you start topstitching the hem you won’t be able to lay it flat again to line that all up so you want it held in place now.
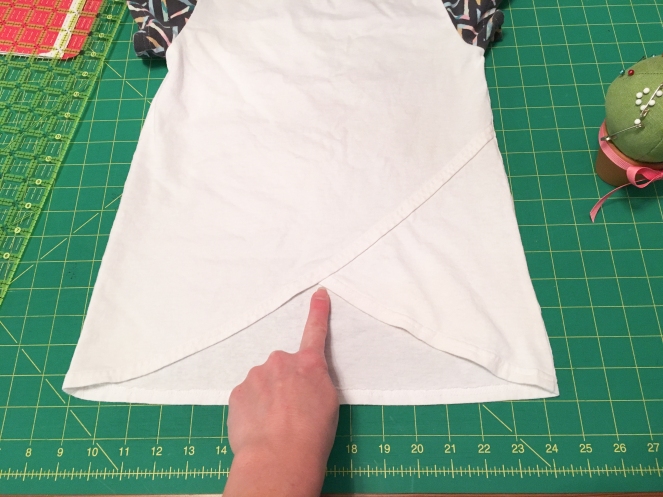
Here I was able to do one nice long hemming stitch starting from the centre back point. I used my serger, but this can also be done with a double needle on a sewing machine. I went down the triangle piece, across the front of the shirt and then up the long angled piece. When I reached the centre point where the two back pieces met I, then, made sure to sew over both pieces to nicely attach them together across the back and up to the side seam.
At this point it’s almost done! I could now finish serging up the side of the shirt and all that’s left is to hem the sleeves and attach the neck binding.
The Isla pattern calls for a lining piece which eliminates the need for binding, but I didn’t have a lining so I needed a way to finish the neckline. I’m not super confident with figuring out how long a piece of binding is needed for necklines or armholes. Or I should say, I wasn’t. Both of these shirts for the girls AND my own shirt refashion turned out excellent in the binding department! It’s like I know what I’m doing! I measured the distance around the neckline, subtracted 2″ and used that number to cut the length of fabric for the binding. I believe I cut it 1 1/2 – 1 3/4″ wide. I forget, but that’s about preference. Do as you like! I serged the short ends together creating a loop and ironed the whole thing in half lengthwise. You could also iron the strip in half before creating the loop. It’s easier. I know it is, but I always tend to do it this way.
Finding centre front and back on the binding and matching those to centre front and back of the shirt I pinned and then sewed the binding to the right side of the shirt. I flipped it under to the wrong side and used my serger to topstitch around the neckline. And that’s all!! I don’t think I’ve forgotten anything!


Here’s just a quick peek of what I did with my own shirt and how impressed I was. (I never did get a before pic.) I knew I wanted to make a tank top. I don’t like running in t-shirts for some reason. I put out a request for some tank top pattern ideas on a Facebook sewing page and got some great pattern ideas which I promptly pinned to my Pinterest. But they either didn’t quite match what I had in mind or called for more fabric than my oversized shirt contained. So I just chopped into what I had! And it was midnight. Not a good idea. I didn’t notice I cut way too close to the logo. And the straps were a bit teensy right on top of the shoulders so I had to be pretty precise with my binding in that area.
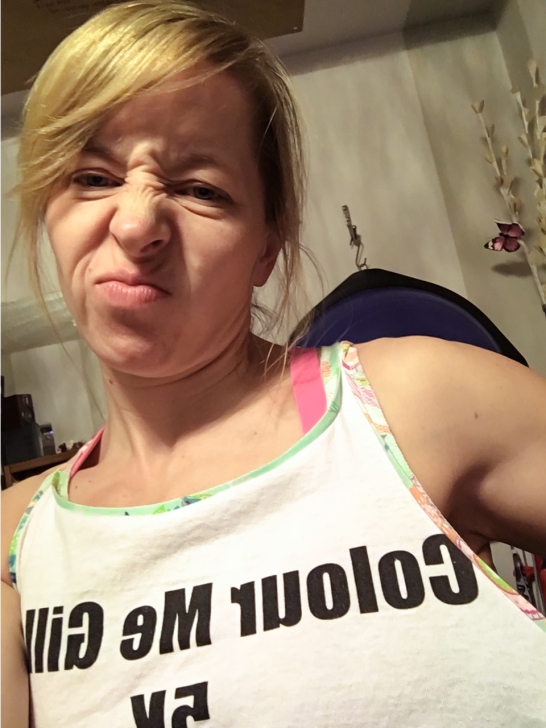
But in the end I pulled it together. It’s not as impressive as the girls shirts were, but I did have someone at the run ask we where we got our shirts. She looked as if she felt royally ripped off that she didn’t get to choose from the fun shirts!! I should probably be careful or I’m going to get requests next year.


Here’s some reality shots for you all before we get to fun stuff!! Did you forget the GIVEAWAY? I almost did.

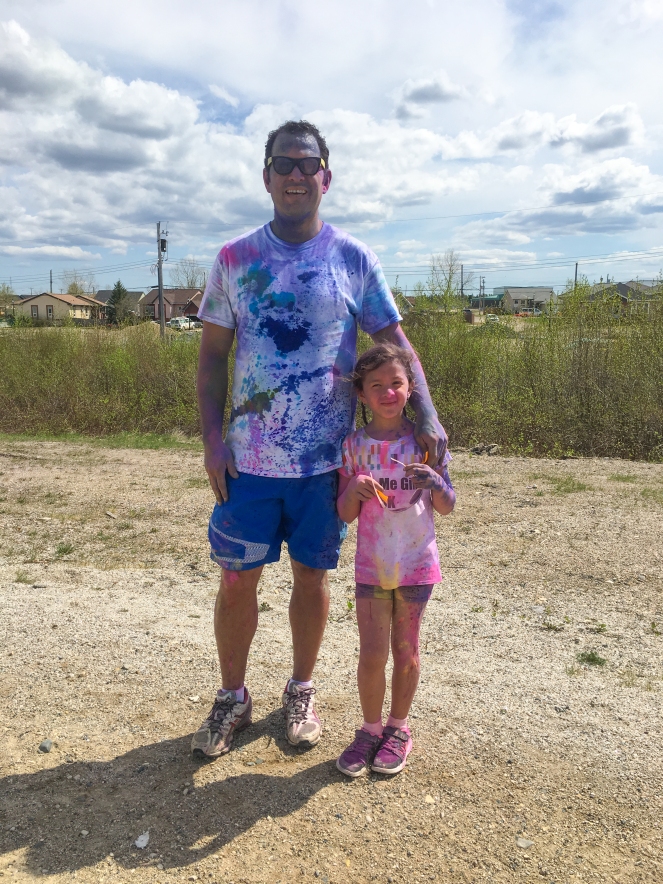
Post-race!! I’d like to report that the colour came out of all three of the girls shirts. Papi was left with pink on his. Weird since he’s clearly covered in blue. We all still have stained skin a day later….. Not so easy to wash off skin, apparently.


Ok!! We need to get to the good stuff. I mean, the other good stuff. The amazing girls over at Simple Life Pattern Company have graciously provided me with a copy of the the Isla pattern that I used as my starting point for the t-shirts. And I’m going to give this one away. Here’s what you need to do:
- Leave me a comment and tell me if you are someone who follows patterns to a T or if you, like me, simply HAVE to change something about every pattern you make.
- You don’t sew (yet)? Tell me if you’ve ever joined in a Colour Run!
- For an extra entry jump over to my IG and follow me there. Here‘s the link to get there. DON’T FORGET TO LIKE THE CONTEST POST SO I KNOW YOU’RE PART OF THE CONTEST!!
This giveaway will run till June 14 at 12:00 pm Central Time and is open internationally. I’m going to attempt to figure out how to work my IG stories and do the draw on there, but I will come back and post the winner here as well.
And there we have it! I’m assuming this gets easier when you do more of these…… I hope you enjoyed this and if you make this shirt, I’d love to see it. Tag me on a pic in IG or post a pic here.
Fabrics used: All three tops used Art Gallery fabric scraps that I had on hand from other projects. The Ice Cream Shop fabric from the Boardwalk Delight collection by Dana Willard was used for the original Isla top as well as one of the short sleeve shirts. The other short sleeve shirt used Triangle Brush Tempera scraps from the Chalk and Paint collection by Caroline Hulse. And finally, for my tank top I used bits of Nib and Pluck Ursinia from the Petal & Plume collection by Bari J.
Affiliate links are used, but I can’t help but give my real thoughts on all of it!

Live your hack! Such a great design. I’ve done a color run with my oldest and she loved it.
LikeLike
Thanks! I think I surprised myself with how much I loved the end result.
LikeLike
I rarely leave a pattern alone. I’ve even almost completed the pattern to a T & ripped it out to change it up 😉 I started young mixing & matching patterns when I was 10ish to get the dreamed up version in my head.
LikeLike
Haha! I love it. We just can’t leave well enough alone.
LikeLike
Good job Sherri!! You know me well enough to know I still have no idea what I am doing while sewing. 😜 I am so excited for you!!
LikeLike
Not true! I’ve seen the dresses your girls wear!
LikeLike
I follow patterns to a T but only because I’m still a beginner and afraid to mess things up…but I dream of altering ;).
LikeLike
Nothing wrong with following a pattern! But it is fun when you find other ways to use the same pattern.
LikeLike
I want to follow patterns exactly, but I almost always add to the length, as aim 5’10” and have a long torso.
LikeLike
As I sit at 5’2″ I’m usually hemming things shorter!
LikeLike
Oh, and I now follow you on IG
(Molli McG)
LikeLike
Found you there! 2 entries done!
LikeLike
How fun for you and your family! Love your changes! I always follow the instructions exactly the first time.
LikeLike
Thanks! And I would say your “handle” tells exactly how you do it!! HAHA
LikeLike
Love what you did! I *try* to follow a pattern to the letter the first time around . . . after that though, anything goes! 😉
LikeLike
Thanks! Sounds like our minds are quite similar.
LikeLike
I usually keep the pattern as is for the first round but I might not follow the instructions if I think there’s a better way 😉
LikeLike
The one thing I never follow instructions on is when it comes to enclosing the raw edges when attaching skirts to bodices. Unless they tell me to. I just can’t handle leaving those edges visible!
LikeLike
I’m always changing something in patterns sometime for the best making it easier.:-) This was a great read.
LikeLike
Thanks so much! Glad you enjoyed it. For real!
LikeLike
I am one who follows patterns to the T. I have not joined in a Colour Run, although it looks adventurous. Thank you for a chance at the giveaway!
LikeLike
I have to follow the pattern exactly, if I try my own thing it hardly turns out. I’m excited, I just started following you on IG.
LikeLike
Thanks for entering! I’ll go find you on IG!
LikeLike
These turned out wonderfully!
Thank you for sharing, and this opportunity for a wonderful pattern.
I can’t leave a pattern alone. I have tried so hard, but I just can’t seem to do it. 🙂
LikeLike
It’s hard! I get it!
LikeLike
Love the shirts! I usually follow a pattern to a T the first time I try a new one, but then I usually change it afterwards!
LikeLike
I think I’m mostly impressed with how many people make the same pattern more than once!! That’s something I’m not good at. Always moving on to the next one!
LikeLike
The tees look amazing! Love your hack. I usually follow the instructions the first time I use a pattern then after that I change things up 😊
LikeLike
I like that. Easier to know how to change things the second time around.
LikeLike
These turned out really cool! I love the back detail on the t-shirts. It took me a minute, but I understand your instructions. Explaining stuff IS hard, especially without photos! 😉
What sort of a serger are you using? Is it a coverstitch machine too?
I think I end up hacking most of the patterns I make… I just like to change things! (I already have the Isla, so I’m not entering the giveaway, but I wanted to comment anyway.)
LikeLike
Awesome, thanks for the feedback. Yes, I do have a coverstitch. Pfaff Coverstitch 3.0. It’s the only one I’ve had so I can’t compare. And thanks for the comment despite having the pattern!
LikeLike
1.Always have to change the pattern up someway
2. Never done a color run but it looks like so much fun your girls did amazing
LikeLike
They DID do amazing! I almost feel bad for being surprised! But I dream of running some longer races with them as they get older!
LikeLike
I’m still fairly new & inexperienced so I always follow patterns to a t. Hoping to get confident enough to be able to havk patterns soon 🙂
Loved your post & all your outfits!
LikeLike
Thanks so much!!
LikeLike
Run 5km? I can hardly even run to the end of the block! Maybe next year I’ll just volunteer to help throw and colour up all your beautiful designs!
LikeLike
Hey! The throwers are necessary too! We needed more!
LikeLike
I normally followed pattern if I am sewing for a customer. But if I am sewing for my kids (I have 5 of them!) I always love to mix and match, and even make changes to the pattern pieces. I love how I can get creative when making clothes for my own family since they can test the fit right away after I finished sewing.
LikeLike
It is MUCH easier sewing for models that live with you! My only issue with sewing for others is that it’s usually a special order so I’m hacking things for others almost always when it’s orders. I guess it’s practice I should be thankful for, but it’s stressful at times!!
LikeLike
I normally sew according to the pattern and then on the second set of clothes, I’d change it in some ways! Isla has always been a pattern I keep kicking myself for not getting when a huge sell just ended. It would be great to finally get my hands on it!
LikeLike
It’s a gooder! If you went over to my IG for that second entry don’t forget to follow me and then like the pic so I know you got that entry too! Trying not to lose anyone’s entries here!! 🙂
LikeLike
Not quite brave enough to freestyle from patterns yet, hopefully one day!
LikeLike
It’ll come. That said though, not everyone likes doing the free styling! Simple Life patterns are great on their own.
LikeLike
I love that you made these shirts for the color run! So much more fun than a plain T. Color runs are so much fun. I always follow patterns to a T but I’m still a newbie when it comes to sewing. Once I feel like I’ve mastered it a little more I’d like to branch out and change some things to patterns I have.
LikeLike
I’m a beginner to sew so I often follow patterns, but I’m impressed by anyone daring to redo a pattern.
Love your bog! 🙂
LikeLike
For sure you’ll find yourself making changes before you know it.
LikeLike
You’re so brilliant and amazingly talented. I am just beginning to sew, hence still trying to learn to follow patterns concisely. However, your post gets me way too excited and i can’t wait to get some creative juices flowing 🙂
LikeLike
Now you sure know how to pay a compliment!!! 🙂 Brilliant might be pushing it, but it sure sounds nice! Thanks so much. And let that creativity flow!
LikeLike
Great job with the refashion. I usually tweak something on a pattern. Sometime big tweaks, sometimes not so big. I love combining prints and fabrics to make something totally unique. Isla looks like a fun little top.
LikeLike
I have that same love of combining fabrics. I have a faux leather/voile combo in my head that I want to try SOON!
LikeLike
Love the way you changed the pattern around! Love tweaking patterns to suit the person the creation is for.
LikeLike
Thank you!
LikeLike
I usually start off intending to follow patterns to a t, then veering off course at some point in the middle. Love the t-shirts – I’m going to give that a try next time I get a too-big t-shirt for my kiddo!
LikeLike
I’d love to see it if you do this!!
LikeLike
I enjoyed reading your post and love how you changed the pattern up to suit you! I never tweak a pattern (not confident enough yet and probably never will because I follow everything to a t lol but maybe 😉). I’ve been wanting the Isla pattern for quite some time now (probably since the beginning of the year when my girl chose it out of about 5 patterns for me to sew up for her Christmas dress this year-yes I was thinking way ahead haha). I have never done a color run (yet).
LikeLike
That’s awesome! Talk about being prepared!
LikeLike
I’d love a copy of the Isla, I’m only new to their patterns! I hack and change things all the time too haha! I have never done a colour run (they seem to be on Mother’s Day here) & I followed you on ig 😘👍
LikeLike
I saw you over there on IG! And welcome to the wonderful world of Slpco patterns. So much goodness to choose from.
LikeLiked by 1 person
I usually stick to the patterns! Although, I have thought about making minor changes to a few patterns here and there!
LikeLike
Take the plunge! It’s a pretty satisfying feeling…..when it works out!
LikeLike
I used to only follow patterns exactly, but now I gladly hack away at patterns! I am also following you on Instagram.
LikeLike
Saw you there! Going to the draw in the next hour. You lucked out! I was supposed to do it at noon.
LikeLike