
Well!! This is quite the adventure! Not only has my imagination been challenged in my designing and sewing, but the emotions! I’m full in with all of those. Last week was such a highlight for me that I really feel the pressure to keep up with myself. Although it’s going to take a lot before I outdo that coat! Thank you so much for the votes and many messages, private and otherwise, encouraging me and letting me know how much you loved that look. It was such a good week! Even coming up with sneak peeks on my Instagram account is fun! And thank goodness because without those things I’d be a mess!
Now we are at Week 3 and this week our task was to be inspired by Halloween candy. Those who know me will laugh at the fact that I had a little trouble spelling Halloween when I started looking for inspiration. No, I know how to spell! It’s just that it’s usually a skipped holiday in our house and I do get some good natured ribbing over that. Candy, however, is NEVER skipped! So take a look at our candy inspired looks but, don’t forget to head on over to the Project Run and Play website for the actual voting!! All votes are super necessary and much appreciated! To get through this week is to get through to the top 3!!

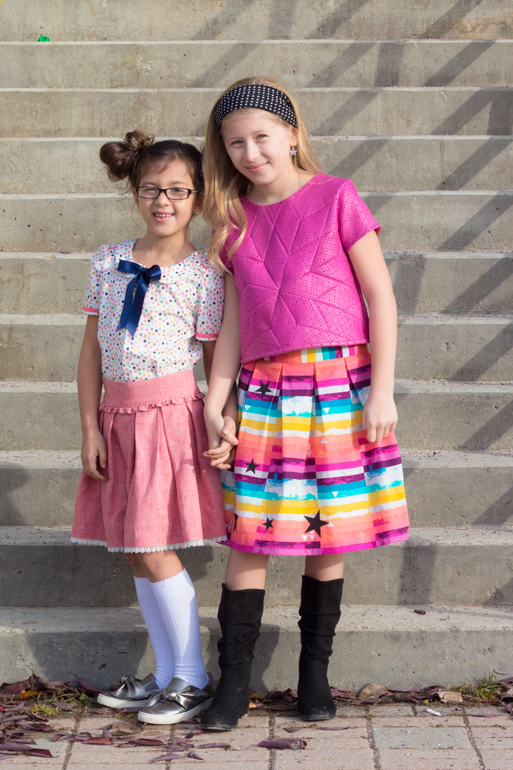
My oldest daughter’s sense of style is still in it’s growing stages and we tend to have a few differences in opinion on what looks right. What we DO agree on is lots of colour! For years her favourite colour was “rainbowish” and I happily allowed that to be a colour. So you can see – VERY clearly – that we have found the perfect rainbowish fabric.

The first candy that came to mind was Starbursts! And it was a perfect opportunity to utilize some quilting skills. I used some strange fabric that I found in the clearance section at JoAnn’s and it even has tiny star burst type cut outs all over it. The lone star quilt pattern became the front of the top for this outfit with a few alterations around the armholes and shoulders so that I wouldn’t have bunched fabric in my shoulder and sleeve seams.
My sewing machine did not like sewing through this mystery fabric so I had to do a second attempt and interface all my diamonds before piecing together. Thankfully it made it all better and I could continue on. It also took care of two other issues. First, the issue of seeing through those little holes. I didn’t want to make an undershirt so this eliminated that necessity. And second, with the interfacing on there I could now iron a crease in the fabric that otherwise did not want to be ironed! Anyone who quilts will know that ironing is very important when piecing!

I do have a little tip for those that struggle with sewing machines that just aren’t wanting to sew through leathers and other different types of fabric (read “not your normal fabrics”). The first, I’ve already mentioned. You can interface the fabric and somehow it tricks your machine into thinking you’re just sewing with quilting cotton! Or, and this was something my friend, Trish, tried once and told me about, was to use a jeans needle. It was the only needle I DIDN’T try! I was thinking all sorts of stretch/ballpoint/universal needles and yet this just needed the jeans needle. I think the leather needle would also work.

One other idea that I was given and sort of worked was to place some tissue paper or parchment paper in the machine along with the fabric. While it did help a bit, the machine still skipped a lot of stitches and worse yet, I couldn’t properly see my corners that I needed to match! So once I had the interfacing figured out I was back on track and feeling a lot more at ease. That was a bit hairy for awhile!


Here’s a little peek at the process for the shirt. Isn’t that star at the beginning fun?
The shirt is drafted using a RTW shirt from the closet for sizing purposes. Due to the many seams on the inside of that star there was no way it was going to be comfortable so I was sure to line it with a thin knit and then bound the hem. The neckline didn’t want to lay flat at first so I ironed some double sided fusible strips along the inside and now it sits perfectly without having to topstitch. That would have messed up the look which is also the reasoning behind the binding of the hem.
I specifically asked how comfortable it was and my daughter said she loved it, but I didn’t really need to ask because it was worn a few days in a row and that was answer enough. I can’t wait to see what it looks like with jeans. We noticed this week that, all of a sudden, she has zero pairs of jeans that fit her! So we’ve ordered some and as soon as they arrive I want to see it!

For the skirt I decided to keep with the “let’s do this myself” train I’ve been on and made a pleated skirt with an invisible zipper. My first attempt was a straight waistband, but that just doesn’t work for this. I needed something that was going to sit lower and therefore needed a curved waistband. Thankfully I have the scraps from one I made for a friend years ago and used those for my pattern. It worked like a charm! I’m realizing as I’m writing this that I never got any good pictures of that waistband though! Shoot!

This fabric is the “Step Above Prism” from the Avantgarde line by Katarina Roccella. It has a few horizontal lines that ended up dictating how I pleated. Took a little brain power, but it worked. Once that was worked out I decided to add some side seam pockets and because that wasn’t enough, why not add an invisible zipper right beside the inseam pocket!!??? That was new for me. Thankfully, there are a few tutorials for that on line.
I wasn’t entirely sure how much further to take the “stars”, but after cutting and laying out some glitter stars, I decided to go ahead and do some more heat transfer. I was concerned that they might be super distracting, but when I set them out they weren’t at all. AND I think that skirt is going to look super cute with a black t-shirt now too!

Have you noticed the many locations for these pictures? Finding the right location was a real stress factor on this week! Nothing was looking right. These girls were absolute troopers! Because what you can’t tell is that the temperature on the 3 days that we went out for yet “one more try” at pics had temperatures between 2-8 degrees Celsius. (35-46 for you Fahrenheit folk.) After those 3 days of trying to find pics that I was satisfied with we had school pictures at the school in town. Leaving for the school my youngest looks up at me with great relief on her face and says, “At least these ones don’t have to be outside!!” They never complained though and were happily given all the Starbursts and Nerds to eat as reward.
Our second look, kinda like the rest of the weeks so far, was not really planned. It was on the plane to the city that I thought “NERDS!!!” And so while shopping for the buffalo plaid I really needed, the little one and I also kept our eyes peeled for anything that made us think of Nerds. We saw lots of dots. But they are lined up too nicely and that bothered me. Nerds don’t fall out of the box in neat lines. They’re also not completely nice and round. Then we found this at Marshall Fabrics!! It’s a Riley Blake fabric from the On Trend collection by Jen Allyson with nicely scattered, imperfect dots. We walked a little further and found some reddish chambray that would suit a little school uniform style for my little nerd.

This girlie wants glasses so badly! Poor girl was the only one who walked away from our last optometrist visit without needing glasses. The lady helping the rest of us felt sorry for her so she let her choose a pair of discontinued sample frames. They have a lovely chili pepper right on the lens! LOL We didn’t use those for this shoot, but it’s those glasses that made me realize this was a great idea for this girl.
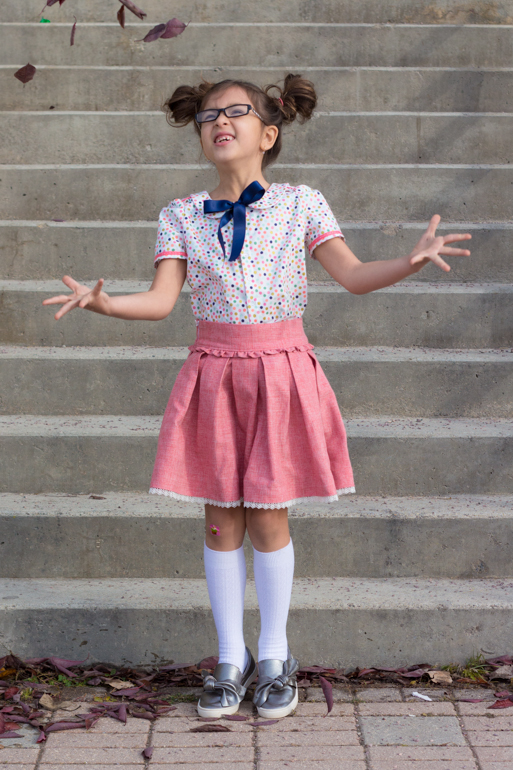
It was very intentional not to create a costume. And with all the nerdy inspiration that Google has, that was sometimes hard not to fall into. As with all the outfits for this whole competition, I want my kids to be able to wear each piece for all sorts of occasions. So within that school girl look, this is what I ended up with!!

The shirt is just too cute. I started with the Figgy’s Sunki Dress pattern. I used the shoulder and sleeves from the pattern and from there I went rogue. I wanted a shirt and not a tunic/dress and a collar because how does one do a bowtie without a collar? It happens to hide the shoulder detail of the Sunki that drew me to the pattern in the first place, but it does peek out a bit. Don’t you love how it overlaps to the front instead of the typical straight line across the top? I inserted a little ruffle to the shoulder seam along with a little bit of trim for a pop of colour. Then I moved over to the back and cut a curved yoke so I could add the trim and ruffle to the back as well. I made sure to curve it so it followed the lines of the collar.

Those sleeves of the Sunki. I wanted those sleeves no matter what. I flipped the pleats to face upwards for something different and then added that same trim around the hem of the sleeve. I will be using these sleeves again, I’m sure.
The tie was one of the ways I was able to pull away from “costume”. Instead I attached a navy ribbon just inside the collar and now we have a more gentle version of the severe bow tie and it allows this to be a cute shirt for all sorts of looks. She wore this top with her overalls from Button week for her school pictures. So freakin’ cute!

Then we have another pleated skirt with invisible zipper (unfortunately I only had a white zipper on hand). I used the same curved waistband as for the other skirt and this time you can get a good look at it. I added a tiny ruffle at the waist and it matches the top just nicely! The pleats are smaller than the Starburst skirt and for this one I added some trim to the hem. I’m a big fan of trim along hemlines.
Let’s be clear! If I had the choice of going to a school with uniforms, I’d pick this one! Of course, since I homeschool these cuties our uniform tends to have a bit more of a pajama flare….

As per usual, I leave you with the link to the voting page, a subtle plea for votes in which I hold back the urge to full on beg, and some more pictures to enjoy on your way out. Here’s a few from our attempt at the indoor pictures. Mami needs indoor photography lights! That’s all I have to say about that!


You’ve knocked it out of the park again! I’m especially impressed with that starburst and I love that rainbow fabric (the stars are perfect there; they look like they belong on the fabric). And the ruffle on the waistband! I love everything! I wish my girls would let me dress them like that.
LikeLike
Thanks Raphaelle! I do think I’m pretty lucky that they get pretty excited with whatever I make. Mostly… That star and the ruffle on the skirt were my 2 favourite parts of this week.
LikeLike
Wow, I love this! That starburst is really impressive and your girls are so cute!
LikeLiked by 1 person
Your looks are beautiful! These are all pieces that they can wear again and again. Great job!
LikeLike
Yes! I tend to gravitate to special occasion dresses so often it’s good to have some more “regular” clothes!
LikeLike
Thank you!
LikeLike
I love how bright and colorful both outfits are! They are so fun, and the glitter stars look great on the starburst skirt. Quilting that mystery fabric sounds like it was very difficult at first, but the end product looks great! Lovely job, as always. 🙂
LikeLike
Thank you! I think I saw you working on some buffalo plaid, no?
LikeLike
You’re welcome! And yes, I am working on a buffalo plaid outfit, and I’m hoping to finish it sometime this weekend. 🙂
LikeLiked by 1 person
Stunning! Just plain stunning! I’m now scheming how to make myself a blouse exactly like that nerds one. It’s the little details that make it so amazing! The shoulder ruffle, the sleeve pleats, the piping!
LikeLike
I think I was smiling the whole time I was making that one!! I loved the details too.
LikeLike
The piecing on the Starburst shirt is perfect! But what I really love is the whole Nerds outfit- all of those tiny ruffles and the trim are adorable! Beautifully done!
LikeLiked by 1 person
Thanks Charity! The little ruffles… yep, I love them too.
LikeLike