

Here we are! At the last week and before I move forward with this week’s look I just want you to know that if you are an Instagrammer, I’d love for you to continue following my other sewing adventures over there on my IG feed. I am part of a blog tour coming up that just so happens to flow nicely with this week’s theme so the party will continue! Or you can sign up on my home page here to get notices of my blog posts. I have some lofty ideas that I hope to carry out over the next months ahead….
ALSO! The contestants for this season have gotten together to plan a thank you for your support and votes this season. We will be having a few collections of patterns, some that have been used for different looks over this season, that we will be GIVING AWAY to a few lucky winners over on IG. It’s coming up once this season’s winner has been announced! So stay tuned over there for that.
Now, that’s a lovely perk, but that’s not the reason you stopped by so let’s get focused on the final week of Season 14 of Project Run and Play. Voting, as usual, happens here. But the pretty pictures and proper descriptions are right where you are.
Things that are “signature” for me:
- Winter coats for my girls
- Machine embroidery on the coats
- Girl’s dresses
- Beautiful back details
- Leather accents
- Mixing textures
- Using different notions
- Small details
- Art Gallery fabric 🙂

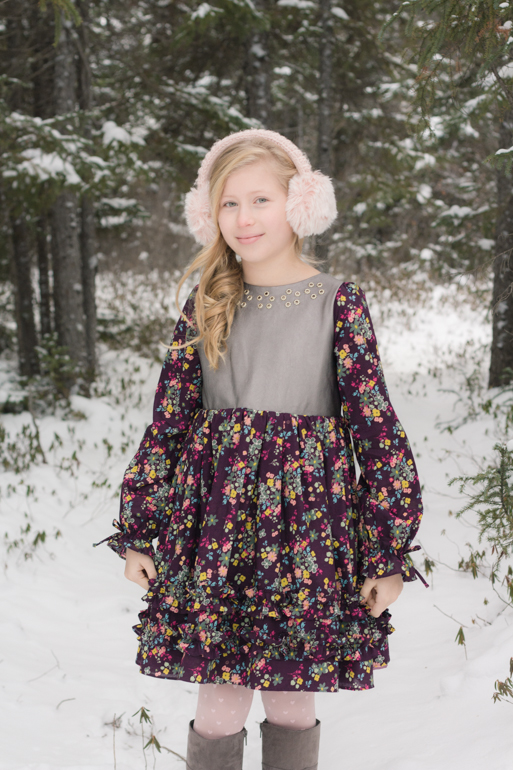
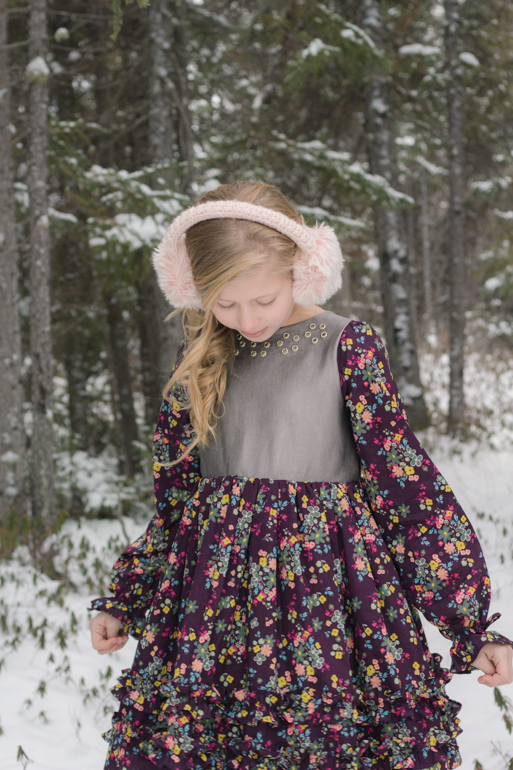
I want to start with this dress. Isn’t it the case, when you know how to sew, that the proper thing to do is sew your children their Christmas outfits, Easter outfits, birthday outfits, any random occasion outfits?? Sometimes I do, sometimes I don’t. This year I’ve decided I have this perfect opportunity to make Christmas dresses for my girls and so I will! (The second one is coming in a few weeks.) Christmas dresses around here don’t have any candy canes and such, but are simply an excuse to get a little more frilly and a little more fancy. Hence, the lace-up back. Kinda fancy, if you ask me.

I started this dress using the Glitz pattern by Little Lizard King. I wanted a longer bodice so I added a few inches to the length. Then I opened up the back into a V so I could try my hand at a lace-up back. Obviously, I needed to use some “leather” so the bodice itself is from the same piece of fabric I used on the week one overalls. There’s something very holiday-like about the metallic tone.

I bought a couple different kinds of eyelets and was super excited about how these small flower shaped eyelets from Michael’s looked against the leather AND suited the floral Blooming Soul voile by Pat Bravo – Art Gallery Fabrics. The leather cording was another way to add multiple textures to the outfit and, let’s face it, is also a lot easier than sewing all that lacing.

I held back from doing the open shoulder that I normally love about this pattern and decided rather to do a simple long sleeve. My daughter’s first response to these sleeves was “Ooo! I love these! It’s just like the fancy ladies!” I had to add a little length to the sleeve to make sure I had enough for the little ruffle at the bottom. I shirred the wrist and hand stitched a small bow on each sleeve.
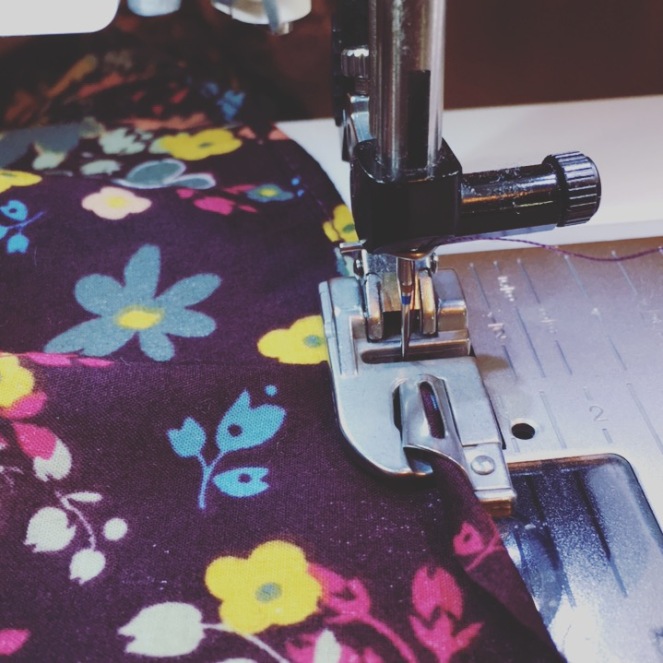
Voile is a light-weight fabric that doesn’t really suit a good northern Canadian winter, so I made a lining for this skirt with a good amount of gathering. I wanted to have the effect of a crinoline, but didn’t even need to pull out the tulle. It was surprising at just how much volume came from the two rows of ruffles that I stitched to the top of the skirt. It is a LOT of narrow hemming to get those ruffles looking pretty, but thank goodness for my narrow hem foot that I love so much.
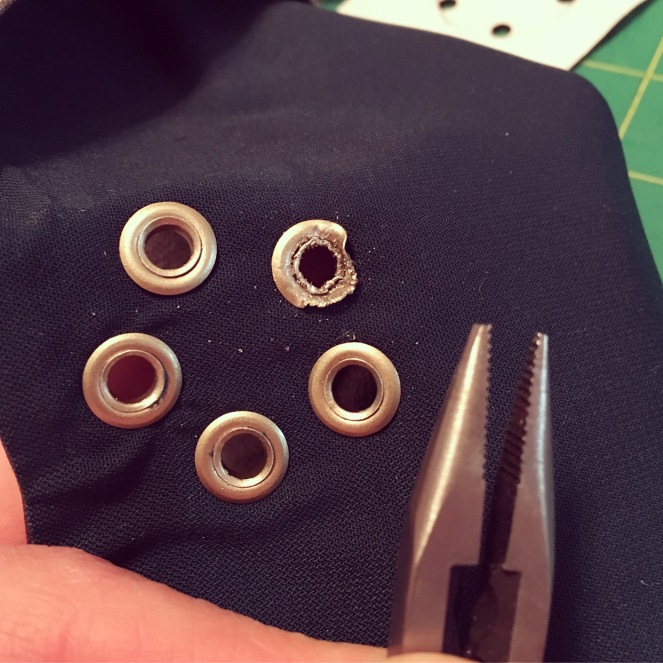
I began to think about ways that I could move the eyelets around to the front in an attractive way. I decided on the small flower-like clusters. The first one I started with was the one in the centre. And wouldn’t you know I got one eyelet in the wrong place. My heart really dropped because I didn’t have enough fabric to recut that bodice. I tried googling whether or not these could be moved and couldn’t find anything about that and only how to remove them. I used the needle-nosed pliers method and am happy to report that eyelets can most definitely be moved over in small increments. It helped that the eyelets themselves are a bit wide so they are then able to cover the previous hole. I’ll also recommend to those wanting to try this, to use a double sided fusible interfacing to keep your lining and outer fabrics together nicely. It wasn’t so important in the back for the lacing because the eyelets weren’t super close together, but in clusters like these, the fabric will tend to bunch in the centre and start looking sloppy.
Once again, I give a huge shout out to my daughters who, without complaint, will go outside in the cold and pretend they aren’t freezing. I am realizing though, that when outside trying to be quick I tend to forget certain detail shots.

Although, we still do get some reality shots and take the time for warming up in a blanket.


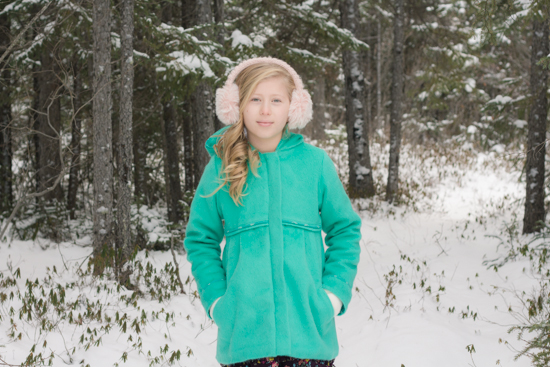
For the last 5 years I’ve been making my girls their winter coats. This year it was time to make another since this girlie just grew out of pretty much everything she owns. I’ve been making the new coat choices since last spring already. When I still hadn’t gotten around to sewing it and found out I’d been invited to take part in Project Run and Play, I immediately knew that the coat should be part of my signature week. I would have to find ways to make it a bit different to the pattern, but I was willing to take that challenge.

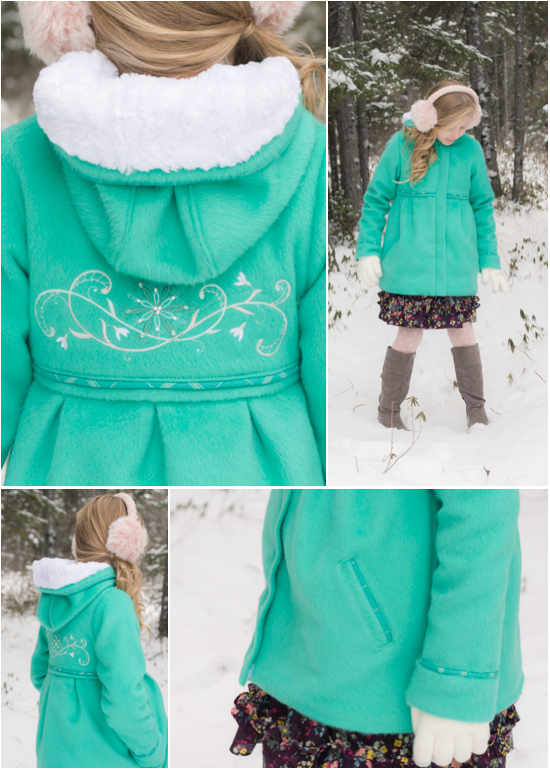
I found this vintage wool when my favourite Winnipeg fabric store closed it’s doors this year. I miss that store. The pattern I finally landed on was the Moiano Coat from Straight Grain. It’s a different choice for me since it’s such a bright colour and with coats I will normally stay neutral. The clearance price was awfully convincing though and I thought it would be fun to find a pattern with a vintage flare for this year’s coat.
The Moiano is actually a spring/summer jacket pattern, but I knew I could make it a winter coat. That thought was confirmed when I found this post with tips for just that very purpose! The post recommends sizing up to make room for the batting, which I did, but then I had to take the seams in so I would recommend making that choice based on what kind of batting you use. The batting I used was quite thin and though it added a bit of bulk, not enough to size up.


As mentioned, I needed to make some changes to the pattern in order to feel like I was tackling the PR&P mandate of coming up with as much originality as possible, all while really liking the pattern as is! One change I did want was to slim down the overall look of the coat just a bit. I did that by lengthening the bodice a few inches and straightening the normally curved bodice seam. Then I tapered in the sides just under the armpits another 1/2″ or so to reduce a bit of the bulky look around the chest and under the arms. It made a big difference.

I chose the zipper instead of buttons and the welt pockets instead of flap pockets. We know from the Buffalo Plaid jacket that I prefer welt pockets! I wanted to add something a bit decorative for the piping without being drastic. I happened to have some Art Gallery Tartan Teal by Pat Bravo that matched pretty perfectly. I had just received it in the mail a few weeks earlier as part of my prize for the sew along to the “All About Art Gallery” theme this summer! I had plans for that so it hurt a little to cut into it, but it had to be done. I used it for the piping on the hood, the front and back yoke, the cuffs and then I snuck a little bit in the welt pockets.

I really wanted to line the whole jacket with that super soft white minky fabric. SOOO soft and not enough in the stash. I’m really glad that I still went ahead and lined the hood. I just love how that white looks with the turquoise fabric.
The pleats on the front and the back are different than the pattern suggested pleats. I added a few extra and instead made them a bit smaller. The cuffs are also different. I omitted the tabs and added length to the cuff itself. They were a bit too short otherwise.
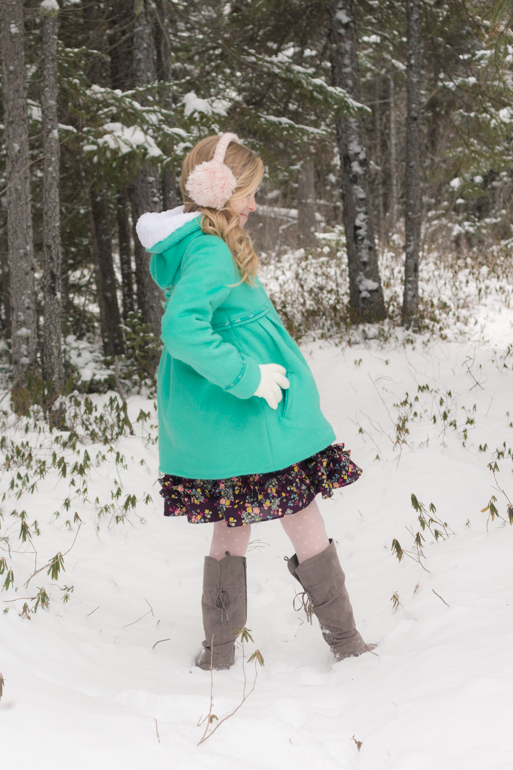
The focal point is, shocker, on the back. Right where I love to add a little flare. I purchased the design from Embroidery Library in a size that would fit the back nicely and not be covered by the hood. To add to the design I pulled out my old jewellery making supplies and found some beads to sew on to the design which highlighted the snowflake in the centre that was otherwise kinda hidden in the tone on tone threads.

You can also see the extra trim I added with the piping here. Yes, that made for some VERY bulky side seams! My sewing machine wasn’t happy with that so I took a hammer to those bulky areas and pounded them down and we were back in business.
I think I will leave it all at that. I’m sure I could highlight a few more things about this outfit but I’ll let the pictures take it from here. None of the contestants are guaranteed that we will make it from one week into the next for this competition and so we cross our fingers as we start all the prep and sewing and hope we make it. Otherwise we should, at the very least, have good clothes for our kids (or siblings). This is the one week that really had pieces that I would have made no matter what. I was able to push myself a bit harder than I might have without the extra pressure of the competition, but finishing this coat and dress really felt like a “two birds with one stone” situation. That coat is already in rotation.
So I leave you with one final thank you for all your support! This has been FUN!! I can’t wait to see how this week ends up. Please go vote!


What an absolutely gorgeous outfit!!! I love the thought and detail you added. I would love a coat like that for myself! The fun color is perfect!! Gorgeous pics too!
LikeLike
Thank you so much! I was nervous about that coat colour being too much, but now I absolutely love it.
LikeLike
Your jacket is absolutely beautiful! The embroidery is a great touch too! Eyelets are my enemy along with metal snaps. I only attempt those when children’s ears aren’t around. 😉
Well done and good luck!!
LikeLike
Bahahaha Eyelets were very close to being my enemy! But now we’re good friends. Next time I’ll know better what kind of prep to do before starting to punch those holes. And thanks!
LikeLiked by 1 person
Beautiful embroidery on the coat!
LikeLiked by 1 person
I love the fabrics you chose. These are amazing pieces!
LikeLike
Thank you! I’m working on the second Christmas dress now and can’t wait to take some pictures of them together! Might even have one of my own for a full on family shoot!
LikeLike
Beautiful dress and coat! I love making special occasion outfits for my sisters and I too. I don’t know if I’ll make all of our Christmas dresses this year, but I do have one planned for myself! Congrats on making it to the finals – I’ve loved all your outfits and it has been so great “meeting you” through this competition! Can’t wait to see what else you have planned!
LikeLike
You too, Elizabeth!
LikeLike
This is amazing!!! I love it so much!!
I think the coat may be my favorite with the embroidery on the back. So may great details though!
LikeLiked by 1 person
Thank you so much!
LikeLike
I can’t even decide which of all these fantastic design elements i love most…the dress, the details on the front and back, all the subtle changes to the coat pattern, the piping, embroidery just WOWWW!!! I loooooooove everything about this!so gorgeous! Off to go vote now ❤️
LikeLike
I love that you don’t have to search too hard for something to like about it!!! 🙂
LikeLike
Oh, my gosh. I love everything about everything. I can’t show my daughter. She’ll want you to adopt her! I am blown away by allof this.
LikeLike
HAHAHA Well, I HAVE talked to my husband about adoption. Usually in Guatemala, but maybe we should expand our search area. Kidding! You’re clearly the best mom for her. Thanks so much.
LikeLike
Beautiful coat– I love the color, the design style, the hood, and the embroidery. Beautifully sewn too.
Deborah Devine
LikeLike
Thank you 🙂
LikeLike
You really do such beautiful work. I love the coat and dress so much and all the little details you add. Just lovely.
LikeLike
You’re always so nice with compliments! Thank you!
LikeLike
I love your look! The colour of the coat is unexpected but perfect! Beautiful work. I’m in awe.
LikeLike
Thank you! It was unexpected for me for sure! But I’m blown away with how much love it’s getting.
LikeLike
I love the sleeves on the dress- so pretty! The eyelets are a fun touch too, and that coat is just gorgeous! Love the embroidery, love the piping, LOVE the hood lining! Beautiful job!
LikeLiked by 1 person
Thanks Charity
LikeLike
Wow, everything about this is absolutely gorgeous! I’m glad you were able to get the eyelet problem fixed-that was scary!
LikeLike
No kidding! I spent a good amount of time doing research before I attempted any action!
LikeLike
Gorgeous looking. I love this.
LikeLike
Thank you! My youngest walked out of her room with this on today! So random! lol
LikeLike